Welcome back to Linux Command Line Hackery series, I hope you've enjoyed this series so far and would have learned something (at least a bit). Today we're going to get into user management, that is we are going to learn commands that will help us add and remove users and groups. So bring it on...
Before we get into adding new users to our system lets first talk about a command that will be useful if you are a non-root user.
Command: sudo
Syntax: sudo [options] command
Description: sudo allows a permitted user to execute a command as a superuser or another user.
Since the commands to follow need root privileges, if you are not root then don't forget to prefix these commands with sudo command. And yes you'll need to enter the root password in order to execute any command with sudo as root.
Command: useradd
Syntax: useradd [options] username
Description: this command is used for creating new user but is kinda old school.
Lets try to add a new user to our box.
[Note: I'm performing these commands as root user, you'll need root privileges to add a new user to your box. If you aren't root then you can try these commands by prefixing the sudo command at the very beginning of these command like this sudo useradd joe. You'll be prompted for your root password, enter it and you're good to go]
useradd joe
To verify that this command has really added a user to our box we can look at three files that store a users data on a Linux box, which are:
/etc/passwd -> this file stores information about a user separated by colons in this manner, first is login name, then in past there used to be an encrypted password hash at the second place however since the password hashes were moved to shadow file now it has a cross (x) there, then there is user id, after it is the user's group id, following it is a comment field, then the next field contains users home directory, and at last is the login shell of the user.
/etc/group -> this file stores information about groups, that is id of the group and to which group an user belongs.
/etc/shadow -> this file stores the encrypted password of users.
Using our command line techniques we learned so far lets check out these files and verify if our user has been created:
cat /etc/passwd /etc/group /etc/shadow | grep joe

In the above screenshot you can notice an ! in the /etc/shadow, this means the password of this user has not been set yet. That means we have to set the password of user joe manually, lets do just that.
Command: passwd
Syntax: passwd [options] [username]
Description: this command is used to change the password of user accounts.
Note that this command needs root privileges. So if you are not root then prefix this command with sudo.
passwd joe
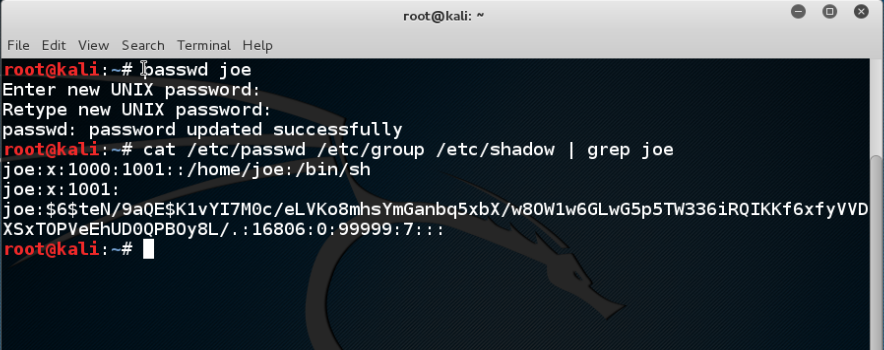
After typing this command, you'll be prompted password and then for verifying your password. The password won't show up on the terminal.
Now joe's account is up and running with a password.
The useradd command is a old school command, lets create a new user with a different command which is kinda interactive.
Command: adduser
Syntax: adduser [options] user
Description: adduser command adds a user to the system. It is more friendly front-end to the useradd command.
So lets create a new user with adduser.
adduser jane

as seen in the image it prompts for password, full name and many other things and thus is easy to use.
OK now we know how to create a user its time to create a group which is very easy.
Command: addgroup
Syntax: addgroup [options] groupname
Description: This command is used to create a new group or add an existing user to an existing group.
We create a new group like this
addgroup grownups

So now we have a group called grownups, you can verify it by looking at /etc/group file.
Since joe is not a grownup user yet but jane is we'll add jane to grownups group like this:
addgroup jane grownups

Now jane is the member of grownups.
Its time to learn how to remove a user from our system and how to remove a group from the system, lets get straight to that.
Command: deluser
Syntax: deluser [options] username
Description: remove a user from system.
Lets remove joe from our system
deluser joe
Yes its as easy as that. But remember by default deluser will remove the user without removing the home directory or any other files owned by the user. Removing the home directory can be achieved by using the --remove-home option.
deluser jane --remove-home
Also the --remove-all-files option removes all the files from the system owned by the user (better watch-out). And to create a backup of all the files before deleting use the --backup option.
We don't need grownups group so lets remove it.
Command: delgroup
Syntax: delgroup [options] groupname
Description: remove a group from the system.
To remove grownups group just type:
delgroup grownups

That's it for today hope you got something in your head.
Related posts
- Underground Hacker Sites
- Pentest Tools Review
- Hacking Tools Hardware
- How To Install Pentest Tools In Ubuntu
- Hacking Tools Github
- What Are Hacking Tools
- Hacking Tools Kit
- Hacker Tools Apk
- New Hack Tools
- Hacking Tools For Pc
- Best Hacking Tools 2020
- Hacker Tools Mac
- Hacker Tools Free Download
- Hacker Tools For Ios
- New Hacker Tools
- Hacking App
- Free Pentest Tools For Windows
- Hackrf Tools
- Pentest Tools Linux
- Ethical Hacker Tools
- Hacker Tools Github
- Hacker Search Tools
- Hack Tools 2019
- Hack And Tools
- Pentest Tools Github
- Hacking Tools Pc
- Hacking Tools Download
- Hack Tools 2019
- Nsa Hacker Tools
- Hack Tools Mac
- Usb Pentest Tools
- Hacks And Tools
- Hack And Tools
- Hacker Tools Mac
- Hacker Tools Windows
- Hacker Tools Free
- Pentest Tools Nmap
- Hack Tools For Games
- Termux Hacking Tools 2019
- Pentest Tools Find Subdomains
- Hacker Tools For Mac
- Hack Website Online Tool
- Hack Website Online Tool
- Hacking Tools 2019
- Hacking Tools Windows
- Install Pentest Tools Ubuntu
- Pentest Reporting Tools
- Hacker Tools Free Download
- How To Make Hacking Tools
- Pentest Tools Open Source
- Hack Tool Apk
- Pentest Tools Download
- Hack Tools Download
- Pentest Tools Subdomain
- Install Pentest Tools Ubuntu
- Hack Tools For Mac
- Physical Pentest Tools
- Pentest Tools For Android
- Hacker Tools Free Download
- Bluetooth Hacking Tools Kali
- Kik Hack Tools
- Tools Used For Hacking
- Hacker Tools For Pc
- Pentest Tools Website Vulnerability
- Pentest Automation Tools
- Hack Tools
- Nsa Hack Tools Download
- Hack And Tools
- Install Pentest Tools Ubuntu
- Pentest Tools Github
- Tools 4 Hack
- What Are Hacking Tools
- Hacker
- Hacking Tools Free Download
- Hacking Tools Github
- Hack App
- Hacking Tools Github
- Pentest Tools For Ubuntu
- Pentest Tools Open Source
- Pentest Tools For Windows
- Hacking Tools Online
- Hacker Tools Free Download
- Hacking Tools Name
- Hack Tools For Pc
- Hackrf Tools
- Hacking Tools Mac
- Hacking Tools Usb
- Hack Tools For Ubuntu
- Hack Tools For Ubuntu
- How To Make Hacking Tools
- Pentest Tools List
- Pentest Tools Port Scanner
- Hacker Tools 2019
- Hacks And Tools
- Free Pentest Tools For Windows
- Hacker Security Tools
- Hacking Tools 2019
- Pentest Tools Subdomain
- What Are Hacking Tools
- Hacker Tools For Ios
- Pentest Tools Windows
- Usb Pentest Tools
- Pentest Tools Find Subdomains
- Hacker Tools For Windows
- Hacker Tools Windows
- Pentest Tools Tcp Port Scanner
- Hacker Tools For Pc
- Pentest Tools Bluekeep
- Hacker Tools Mac
- Hack Tool Apk No Root
- Hack Rom Tools
- Hacker Tools
- Hacker Tools Windows
- Hacker Tools 2019
- Pentest Tools For Android
- Pentest Tools Url Fuzzer
- Hack Tools Github
- Hacker Tools
- Hacker Tools Mac
- Hacker Tools For Pc
- Easy Hack Tools
- Nsa Hack Tools
- Best Pentesting Tools 2018
- Game Hacking
- Hack Tools
- Free Pentest Tools For Windows
- Bluetooth Hacking Tools Kali
- Pentest Tools For Ubuntu
- Hack Tools For Pc
- Hacker Tools For Windows
- Hacker Tools Hardware
- Pentest Tools Online
- Hacker Tools 2020
- Hack Apps
- Hacker Tools Windows
- Hack Tools