5/16/2020

DiscordRAT - Discord Remote Administration Tool Fully Written In Python


Discord Remote Administration Tool fully written in Python3.
This is a RAT controlled over Discord with over 20 post exploitation modules.

Disclaimer:
This tool is for educational use only, the author will not be held responsible for any misuse of this tool.
This is my first project on github as such this project is far from perfect , I will listen to any criticism as long as it is constructive.

Setup Guide:
You will first need to register a bot with the Discord developper portal and then add the bot to the server that you want. Once the bot is created copy the token of your bot and paste it at line 11.
Now on go on discord , go to the settings , go to appearance , scroll to the bottom , and activate "Developer Mode",now go to the server where your bot added right click on the channel where you want the bot to post , click copy ID and finally , paste the ID in the parenthesis in line 99.
Install requirements ("pip3 install -r requirements.txt")
Then if steps above were succesful after launching the python file, or executable , it will post a message on the server with a generated uuid , all that is left to do is posting "!interact " with the given uuid.
Now your bot should be available to use !
Requirements:
Python3,Windows
Compiling to exe (optional):
If you want to compile the bot to exe you can use PyInstaller.
Inside the directory of the bot execute "PyInstaller --onefile --noconsole DiscordRAT.py" or "python3 -m PyInstaller --onefile --noconsole DiscordRAT(NoCV).py (or DiscordRAT.py)"
If an error occured during compiling try to import the discord module "PyInstaller --onefile --noconsole --hidden-import=discord DiscordRAT.py"
Advice:
If you have problems with the installation of win32api or other modules , try installing it in a python virtual environment.
There are two python files one has opencv and webcam related modules the other does not, this has been done because open-cv adds multiple dozens of megabytes to the compiled .exe file.


via KitPloit

More info


  1. Hacking With Swift
  2. Hacking Etico Pdf
  3. Javascript Hacking
  4. Growth Hacking Instagram
  5. Growth Hacking Instagram
  6. Que Estudiar Para Ser Hacker
  7. Hacking Etico Libro
  8. Que Es El Hacking

How To Repair A Crashed SD Card And Protect Your Data

One of the many reasons users prefer Android devices is the ability to expand the amount of available storage space using the MicroSD Card. Since we have the ability add up to 256GB of external storage to Android devices today, you're bound to choke up when the SD card crashes without any tell-tale signs.
If you're experiencing issues on how to repair a crashed SD card on your Android device, there are certain fixes you can try out. Since there's not a singular solution to SD Card issues, we've created a guide to help you detect the issue with your external storage and mentioned multiple solutions to get your SD card working and even retrieve your stored data along with it.


Before you start

Don't format the card if you want to retain any of the photos on it. You can follow the tips in our separate article on how to format a write-protected SD card after you've tried to recover any files that are on your card.

Now, try and find a different card reader. If you've inserted an SD card into your laptop or PC's built-in slot and nothing happens, try using a different computer or a USB card reader.
Sometimes it's the reader at fault – not the card. You can buy a USB SD card reader online for just a couple of pounds which will accept both microSD and standard SD cards.

Steps to Repair a Crashed SD Card and Protect your Data:

Step 1 – Physically clean the SD Card

Despite being durable and built to last, SD cards are prone to crashing sometimes due to physical damage. Since you carry your phone around everywhere, some dirt and dust are bound to fill up in the cracks, that can make SD card stop working from time to time.
The first thing you can try to do on how to repair a crashed SD card is physically scrub and clean it.
  • Remove the MicroSD card from your Android device and place it on a clean surface. Make sure that you turn off your phone before pulling out the SD card for safety.
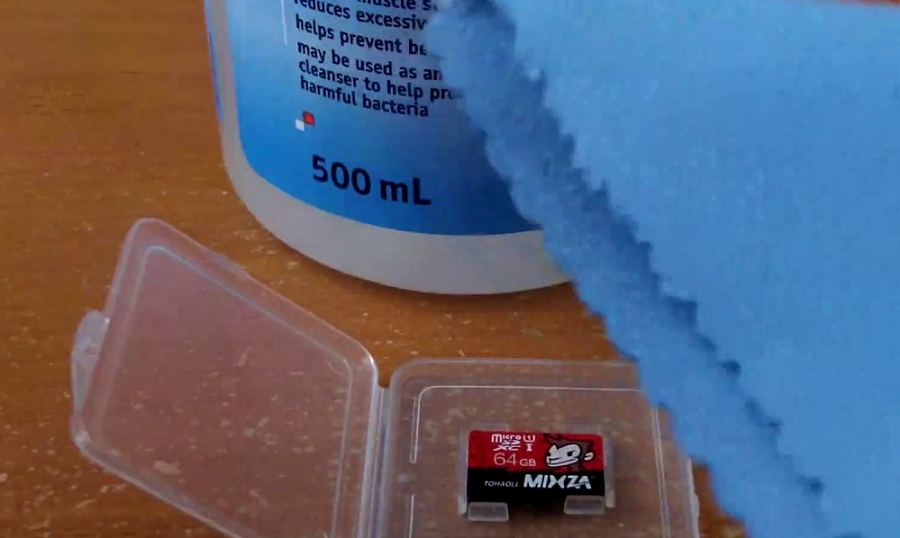
  • Flip the MicroSD card and using a white eraser, gently scrub the gold contact pins of the SD card to get rid of any residual dirt or grime.
  • If you have an alcohol-based cleaning solution or even nail polish remover around, dab it on to the connector pins using a Q-tip and gently rub it.
Once the SD card has dried out, you can plug it back into your Android device and turn it on to see if the solution has worked.


Step 2 – Format the SD Card

If your SD card is being detected by the Android device but you're having trouble accessing the saved files, there's a good chance that the files are corrupt. This could either be due to a particular broken file in the saved storage, or a virus that is causing the issue.
Either way, the only option there is left for you to try out is make the SD card reusable for formatting it.
  • From the home screen of your Android device, head over to the Settings app and then scroll down to find the Storage
  • In the Storage tab, you'll be able to find the Erase SD Card option, so go ahead and select it.
  • Confirm your action to delete all of the files and folders stored on your SD card and this should effectively solve the issue.

Step 3 – Check the SD card compatibility

If you are trying to figure out how to repair a crashed SD card on an older Android device, you might just need to look at the details more carefully. If your SD card fails to be recognized on the mobile device but works with your computer, the problem could be related to compatibility.
  • If the MicroSD card that you are trying to use with your older phone is SDXC version (built for higher transfer speeds), it will not be recognized.
  • Look up the maximum capacity of expandable storage that is supported by your device, since they can vary from starting at 64GB to all the way up to 256GB.

Step 4 – Diagnose the SD card using a PC

If a simple format did not help you solve the SD card problem, you might need a more technical analysis of the issue. To do so, you can plug in your SD card into a computer and use the diagnostic tools to find out the pertaining errors and effectively fix them.
  • Connect your Android mobile device to a computer using a USB cable.
  • Make sure that you connect Android as MSC (Mass storage mode) and not MTP (Media transfer mode). You can do this using the notification menu once you connect the phone to your computer.
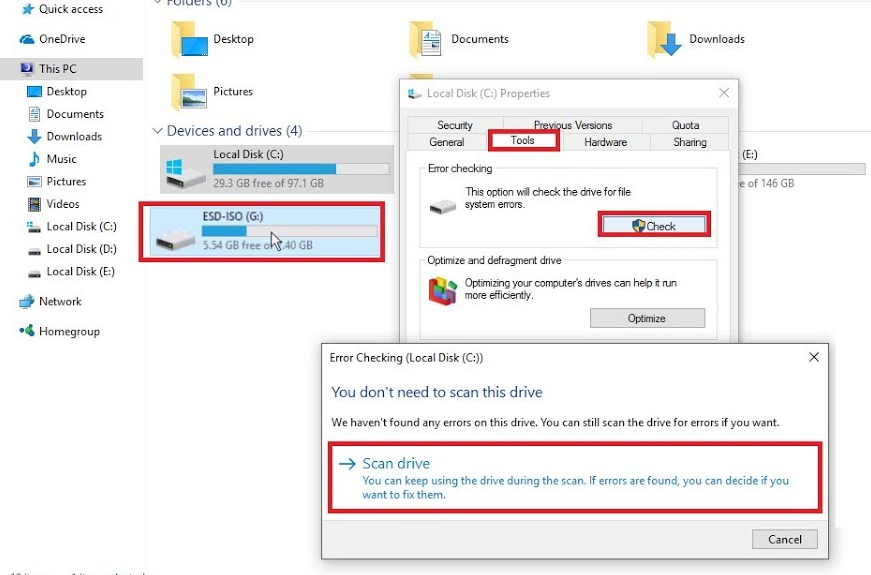
  • Launch the Windows Explorer and right click on the SD card driver you see on the screen. In the options menu, choose Properties – Tools – Error Checking and wait for the entire process to complete.
  • The computer will try to update the software for your SD card and fix any errors that are causing it to crash.

Step 5 – Use chkdsk to fix/repair a corrupted SD card without data loss

The "chkdsk" command is your first choice for damaged SD card repair. Requiring no format, it allows you to fix or repair a corrupted SD card and regain access to all your important files on the device. Let's see how it works. (I'm using Windows 7 for this demonstration)
1. Plug in your SD card to your computer with a card reader.
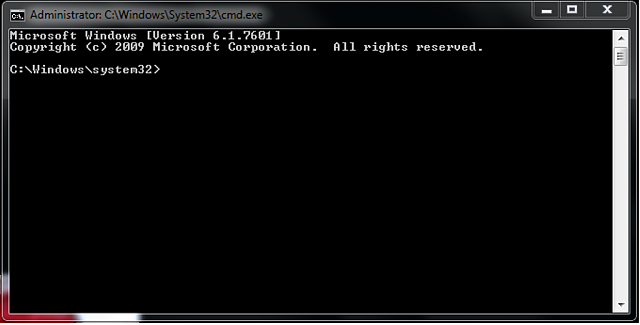
2. Go to the start menu, type in "cmd" in a search bar, hit enter and then you can see something named "cmd. exe" in a list of programs.
3. Right-click "cmd. exe" and then you will get the following command windows that allow you to fix your corrupted SD card without formatting.
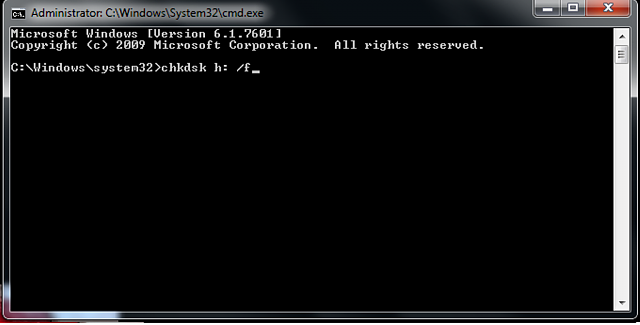
4. Type in "chkdsk /X /f sd card letter:" or "chkdsk sd card letter: /f ", for example,"chkdsk /X /f G:" or "chkdsk h: /f".
After finishing all the steps, Windows will have checked and fixed the file system of the SD card. It usually takes several minutes. After that, if you see "Windows has made corrections to the file system" in the command window, then congratulations! The damaged SD card is successfully fixed and you can see your data again. If not, you should try a third-party data recovery software to retrieve your files from the damaged SD card and repair it by formatting.
Once the process has been completed, you can go ahead and pop the SD card back into your Android device and see if the issue has been resolved.

Step 6 : Use EaseUS Data Recovery Wizard to recover data from damaged SD card

1. Connect the corrupted SD card to your PC, launch EaseUS's data recovery software, select the card and click "Scan".
2. A quick scan will first start to search all the lost and existing data on the SD card. And after that, a deep scan will automatically launch in order to find more files.
3. After the scan, choose those files you want to recover and click the "Recover" button to retrieve them back.

Final Words :

So finally through this article, you have got to know about the method by which the SD card could be repaired and hence the data in it could be saved for the further access. We have tried to present the method in easy to grab manner and we believe that you could possibly get to know about it easily. Hope that you would have liked the information in this post, if it is so then please share it with others. Also, do not forget to share the post with others, let most of the people know about the method. Share your comments about the post through using the comment box below. At last never the fewer thanks for reading this post!
Read more

macSubstrate - Tool For Interprocess Code Injection On macOS


macSubstrate is a platform tool for interprocess code injection on macOS, with the similar function to Cydia Substrate on iOS. Using macSubstrate, you can inject your plugins (.bundle or .framework) into a mac app (including sandboxed apps) to tweak it in the runtime.
  • All you need is to get or create plugins for your target app.
  • No trouble with modification and codesign for the original target app.
  • No more work after the target app is updated.
  • Super easy to install or uninstall a plugin.
  • Loading plugins automatically whenever the target app is relaunched.
  • Providing a GUI app to make injection much easier.

Prepare
  • Disable SIP
  • Why should disable SIP
    System Integrity Protection is a new security policy that applies to every running process, including privileged code and code that runs out of the sandbox. The policy extends additional protections to components on disk and at run-time, only allowing system binaries to be modified by the system installer and software updates. Code injection and runtime attachments to system binaries are no longer permitted.

Usage
  1. download macSubstrate.app, put into /Applications and launch it.
    StatusBar
  2. grant authorization if needed.
  3. install a plugin by importing or dragging into macSubstrate.
    ToInstall
  4. launch the target app.
    step 3 and step 4 can be switched
    Once a plugin is installed by macSubstrate, it will take effect immediately. But if you want it to work whenever the target app is relaunched or macOS is restarted, you need to keep macSubstrate running and allow it to automatically launch at login.
  5. uninstall a plugin when you do not need it anymore.
    Installed

Plugin
macSubstrate supports plugins of .bundle or .framework, so you just need to create a valid .bundle or .framework file. The most important thing is to add a key macSubstratePlugin into the info.plist, with the dictionary value:
Key Value
TargetAppBundleID the target app's CFBundleIdentifier, this tells macSubstrate which app to inject.
Description brief description of the plugin
AuthorName author name of the plugin
AuthorEmail author email of the plugin
Please check the demo plugins demo.bundle and demo.framework for details.

Xcode Templates
macSubstrate also provides Xcode Templates to help you create plugins conveniently:
  1. ln -fhs ./macSubstratePluginTemplate ~/Library/Developer/Xcode/Templates/macSubstrate\ Plugin
  2. Launch Xcode, and there will be 2 new plugin templates for you.

Security
  1. SIP is a new security policy on macOS, which will help to keep you away from potential security risk. Disable it means you will lose the protection from SIP.
  2. If you install a plugin from a developer, you should be responsible for the security of the plugin. If you do not trust it, please do not install it. macSubstrate will help to verify the code signature of a plugin, and I suggest you to scan it using VirusTotal. Anyway, macSubstrate is just a tool, and it is your choice to decide what plugin to install.


Related news

Practical Dictionary Attack On IPsec IKE

We found out that in contrast to public knowledge, the Pre-Shared Key (PSK) authentication method in main mode of IKEv1 is susceptible to offline dictionary attacks. This requires only a single active Man-in-the-Middle attack. Thus, if low entropy passwords are used as PSKs, this can easily be broken.

This week at the USENIX Security conference, Dennis Felsch will present our research paper on IPsec attacksThe Dangers of Key Reuse: Practical Attacks on IPsec IKE. [alternative link to the paper]

In his blog post, Dennis showed how to attack the public key encryption based authentication methods of IKEv1 (PKE & RPKE) and how to use this attack against IKEv2 signature based authentication method. In this blog post, I will focus on another interesting finding regarding IKEv1 and the Pre-Shared Key authentication.

IPsec and Internet Key Exchange (IKE)

IPsec enables cryptographic protection of IP packets. It is commonly used to build VPNs (Virtual Private Networks). For key establishment, the IKE protocol is used. IKE exists in two versions, each with different modes, different phases, several authentication methods, and configuration options. Therefore, IKE is one of the most complex cryptographic protocols in use.

In version 1 of IKE (IKEv1), four authentication methods are available for Phase 1, in which initial authenticated keying material is established: Two public key encryption based methods, one signature based method, and a PSK (Pre-Shared Key) based method.

The relationship between IKEv1 Phase 1, Phase 2, and IPsec ESP. Multiple simultaneous Phase 2 connections can be established from a single Phase 1 connection. Grey parts are encrypted, either with IKE derived keys (light grey) or with IPsec keys (dark grey). The numbers at the curly brackets denote the number of messages to be exchanged in the protocol.

Pre-Shared Key authentication

As shown above, Pre-Shared Key authentication is one of three authentication methods in IKEv1. The authentication is based on the knowledge of a shared secret string. In reality, this is probably some sort of password.

The IKEv1 handshake for PSK authentication looks like the following (simplified version):


In the first two messages, the session identifier (inside HDR) and the cryptographic algorithms (proposals) are selected by initiator and responder. 

In messages 3 and 4, they exchange ephemeral Diffie-Hellman shares and nonces. After that, they compute a key k by using their shared secret (PSK) in a PRF function (e.g. HMAC-SHA1) and the previously exchanged nonces. This key is used to derive additional keys (ka, kd, ke). The key kd is used to compute MACI over the session identifier and the shared diffie-hellman secret gxy. Finally, the key ke is used to encrypt IDI (e.g. IPv4 address of the peer) and MACI

Weaknesses of PSK authentication

It is well known that the aggressive mode of authentication in combination with PSK is insecure and vulnerable against off-line dictionary attacks, by simply eavesedropping the packets. For example, in strongSwan it is necessary to set the following configuration flag in order to use it:
charon.i_dont_care_about_security_and_use_aggressive_mode_psk=yes

For the main mode, we found a similar attack when doing some minor additional work. For that, the attacker needs to waits until a peer A (initiator) tries to connect to another peer B (responder). Then, the attacker acts as a man-in-the middle and behaves like the peer B would, but does not forward the packets to B.

From the picture above it should be clear that an attacker who acts as B can compute (gxy) and receives the necessary public values session ID, nI, nR. However, the attacker does not know the PSK. In order to mount a dictionary attack against this value, he uses the nonces, and computes a candidate for for every entry in the dictionary. It is necessary to make a key derivation for every k with the values of the session identifiers and shared Diffie-Hellmann secret the possible keys ka, kd and ke. Then, the attacker uses ke in order to decrypt the encrypted part of message 5. Due to IDI often being an IP address plus some additional data of the initiator, the attacker can easily determine if the correct PSK has been found.

Who is affected?

This weakness exists in the IKEv1 standard (RFC 2409). Every software or hardware that is compliant to this standard is affected. Therefore, we encourage all vendors, companies, and developers to at least ensure that high-entropy Pre-Shared Keys are used in IKEv1 configurations.

In order to verify the attack, we tested the attack against strongSWAN 5.5.1.

Proof-of-Concept

We have implemented a PoC that runs a dictionary attack against a network capture (pcapng) of a IKEv1 main mode session. As input, it also requires the Diffie-Hellmann secret as described above. You can find the source code at github. We only tested the attack against strongSWAN 5.5.1. If you want to use the PoC against another implementation or session, you have to adjust the idHex value in main.py.

Responsible Disclosure

We reported our findings to the international CERT at July 6th, 2018. We were informed that they contacted over 250 parties about the weakness. The CVE ID for it is CVE-2018-5389 [cert entry].

Credits

On August 10th, 2018, we learned that this attack against IKEv1 main mode with PSKs was previously described by David McGrew in his blog post Great Cipher, But Where Did You Get That Key?. We would like to point out that neither we nor the USENIX reviewers nor the CERT were obviously aware of this.
On August 14th 2018, Graham Bartlett (Cisco) email us that he presented the weakness of PSK in IKEv2 in several public presentations and in his book.
On August 15th 2018, we were informed by Tamir Zegman that John Pliam described the attack on his web page in 1999.

FAQs

  • Do you have a name, logo, any merchandising for the attack?
    No.
  • Have I been attacked?
    We mentioned above that such an attack would require an active man-in-the-middle attack. In the logs this could look like a failed connection attempt or a session timed out. But this is a rather weak indication and no evidence for an attack. 
  • What should I do?
    If you do not have the option to switch to authentication with digital signatures, choose a Pre-Shared Key that resists dictionary attacks. If you want to achieve e.g. 128 bits of security, configure a PSK with at least 19 random ASCII characters. And do not use something that can be found in public databases.
  • Am I safe if I use PSKs with IKEv2?
    No, interestingly the standard also mentions that IKEv2 does not prevent against off-line dictionary attacks.
  • Where can I learn more?
    You can read the paper[alternative link to the paper]
  • What else does the paper contain?
    The paper contains a lot more details than this blogpost. It explains all authentication methods of IKEv1 and it gives message flow diagrams of the protocol. There, we describe a variant of the attack that uses the Bleichenbacher oracles to forge signatures to target IKEv2. 

Related links


  1. Hacking Bluetooth Speaker
  2. Javascript Hacking
  3. Start Hacking
  4. Hacking Iphone
  5. Python Hacking
  6. Master Growth Hacking
  7. Hacking Music
  8. Significado Hacker
  9. Wifi Hacking App
  10. Como Hacker
  11. Hacking Web Sql Injection

WordPress 5.0.0 Crop-Image Shell Upload Exploit

Related articles