6/08/2020

WiFi Hacking On Tablets

Disclaimer: Don't hack anything where you don't have the authorization to do so. Stay legal.

Ever since I bought my first Android device, I wanted to use the device for WEP cracking. Not because I need it, but I want it :) After some googling, I read that you can't use your WiFi chipset for packet injection, and I forgot the whole topic.

After a while, I read about hacking on tablets (this was around a year ago), and my first opinion was: 
"This is stupid, lame, and the usage of that can be very limited".

After playing one day with it, my opinion just changed: 
"This is stupid, lame, the usage is limited, but when it works, it is really funny :-)"

At the beginning I looked at the Pwn Pad as a device that can replace a pentest workstation, working at the attacker side. Boy was I wrong. Pwn Pad should be used as a pentest device deployed at the victim's side!

You have the following options:
  1. You have 1095 USD + VAT + shipping to buy this Pwn Pad
  2. You have around 200 USD to buy an old Nexus 7 tablet, a USB OTG cable, a USB WiFi dongle (e.g. TP-Link Wireless TL-WN722N USB adapter works).


In my example, I bought a used, old 2012 Nexus WiFi. Originally I bought this to play with different custom Android ROMs, and play with rooted applications. After a while, I found this Pwn Pad hype again and gave it a shot.

The Pwn Pad community edition has an easy-to-use installer, with a proper installation description. Don't forget to backup everything from your tablet before installing Pwn Pad on it!

I don't want to repeat the install guide, it is as easy as ABC. I booted a Ubuntu Live CD, installed adb and fastboot, and it was ready-to-roll. I have not measured the time, but the whole process was around 20 minutes.


The internal WiFi chipset can be used to sniff traffic or even ARP poisoning for active MiTM. But in my case, I was not able to use the internal chipset for packet injection, which means you can't use it for WEP cracking, WPA disauth, etc. This is where the external USB WiFi comes handy. And this is why we need the Pwn Pad Android ROM, and can't use an average ROM.

There are two things where Pwn Pad really rocks. The first one is the integrated drivers for the external WiFi with monitor mode and packet injection capabilities. The second cool thing is the chroot wrapper around the Linux hacking tools. Every hacking tool has a start icon, so it feels like it is a native Android application, although it is running in a chroot Kali environment.

Wifite

The first recommended app is Wifite. Think of it as a wrapper around the aircrack - airmon - airodump suite. My biggest problem with WEP cracking was that I had to remember a bunch of commands, or have the WEP cracking manual with me every time I have to crack it. It was overcomplicated. But thanks to Wifite, that is past.

In order to crack a WEP key, you have to:
  1. Start the Wifite app
  2. Choose your adapter (the USB WiFi)

  3. Choose the target network (wep_lan in the next example)
  4. Wait for a minute 
  5. PROFIT!

SSH reverse shell

This is one of the key functionalities of the Pwn Pad. You deploy the tablet at the Victim side, and let the tablet connect to your server via (tunneled) SSH.

The basic concept of the reverse shells are that an SSH tunnel is established between the Pwn Pad tablet (client) and your external SSH server (either directly or encapsulated in other tunneling protocol), and remote port forward is set up, which means on your SSH server you connect to a localport which is forwarded to the Pwn Pad and handled by the Pwn Pad SSH server.

I believe the best option would be to use the reverse shell over 3G, and let the tablet connect to the victim network through Ethernet or WiFi. But your preference might vary. The steps for reverse shells are again well documented in the documentation, except that by default you also have to start the SSH server on the Pwn Pad. It is not hard, there is an app for that ;-) On your external SSH server you might need to install stunnel and ptunnel if you are not using Kali. The following output shows what you can see on your external SSH server after successful reverse shell.

root@myserver:/home/ubuntu# ssh -p 3333 pwnie@localhost
The authenticity of host '[localhost]:3333 ([127.0.0.1]:3333)' can't be established.
ECDSA key fingerprint is 14:d4:67:04:90:30:18:a4:7a:f6:82:04:e0:3c:c6:dc.
Are you sure you want to continue connecting (yes/no)? yes
Warning: Permanently added '[localhost]:3333' (ECDSA) to the list of known hosts.
pwnie@localhost's password:
  _____      ___  _ ___ ___   _____  _____ ___ ___ ___ ___
 | _ \ \    / / \| |_ _| __| | __\ \/ / _ \ _ \ __/ __/ __|
 |  _/\ \/\/ /| .` || || _|  | _| >  <|  _/   / _|\__ \__ \
 |_|   \_/\_/ |_|\_|___|___| |___/_/\_\_| |_|_\___|___/___/

 Release Version: 1.5.5
 Release Date: 2014-01-30
 Copyright 2014 Pwnie Express. All rights reserved.

 By using this product you agree to the terms of the Rapid Focus
 Security EULA: http://pwnieexpress.com/pdfs/RFSEULA.pdf

 This product contains both open source and proprietary software.
 Proprietary software is distributed under the terms of the EULA.
 Open source software is distributed under the GNU GPL:
 http://www.gnu.org/licenses/gpl.html

pwnie@localhost:~$

Now you have a shell on a machine that is connected to the victim network. Sweet :) Now Metasploit really makes sense on the tablet, and all other command-line tools.

EvilAP and DSniff

Start EvilAP (it is again a wrapper around airobase), choose interface (for me the Internal Nexus Wifi worked), enter an SSID (e.g freewifi), enter channel, choose whether force all clients to connect to you or just those who really want to connect to you, and start.


The next step is to start DSniff, choose interface at0, and wait :) In this example, I used a popular Hungarian webmail, which has a checkbox option for "secure" login (with default off). There are sooo many problems with this approach, e.g. you can't check the certificate before connecting, and the login page is delivered over HTTP, so one can disable the secure login checkbox seamlessly in the background, etc. In this case, I left the "secure" option on default off.


In the next tutorial, I'm going to show my next favorite app, DSploit ;)

Lessons learned

Hacking has been never so easy before
In a home environment, only use WPA2 PSK
Choose a long, nondictionary passphrase as the password for WPA2
Don't share your WiFi passwords with people you don't trust, or change it when they don't need it anymore
Don't let your client device auto-connect to WiFi stations, even if the SSID looks familiar

I believe during an engagement a Pwn Plug has better "physical cloaking" possibilities, but playing with the Pwn Pad Community Edition really gave me fun moments.

And last but not least I would like to thank to the Pwn Pad developers for releasing the Community Edition!

More info

HACKING PASSWORDS USING CREDENTIAL HARVESTER ATTACK

Everything over the internet is secured by the passwords. You need a login to do any stuff on any social or banking website. Passwords are the first security measure for these type of websites. So, I brought a tutorial on how to hack such sort of login passwords. This tutorial is based on credential harvester attack method. In which you will know about hacking passwords using credential harvester attack method.

HACKING PASSWORDS USING CREDENTIAL HARVESTER ATTACK

REQUIREMENTS

It's very simple and easy to follow. Before you start, you need the following things to work with.
  1. Kali Linux OS
  2. Target Website

STEPS TO FOLLOW

  • Run the Kali Linux machine. If you have not Kali Linux installed, you can grab a free copy and install it as a virtual machine. You can learn more about Kali Linux VirtualBox installation.
  • Sign in to Kali Linux by entering username root and password toor.
  • As you'll sign in, navigate to the Applications > Social Engineering Tools > Social Engineering as shown in the following screenshot.
  • Now you will see the different options. You have to choose Social Engineering Attacks by simply entering its number in the terminal. Once you do it, it will show a few options further. Simply choose Website Vector Attack by putting its number.
  • Website vector attack will show up it's a different type of attacks. We are going to use Credential Harvester Attack.
  • Choose the Site Clone option. As you do it, it will ask for your public IP address. Just open up a new terminal and type ifconfig. It'll show the public IP. Just copy it and paste in the previous terminal as shown in the following screenshots.
  • After we do it. Enter the target website of which passwords you want to hack. Make sure to use a website that has username and password on the same page.
  • All done now. As someone opens up the browser on the public IP we specified, it'll show up the website that we entered in the previous step. Now as someone enters their username or password, it will be captured in the terminal.

That's all. If you're not clear yet. You can watch the following complete video tutorial on how to do it.
Related news

6/07/2020

How Do I Get Started With Bug Bounty ?

How do I get started with bug bounty hunting? How do I improve my skills?


These are some simple steps that every bug bounty hunter can use to get started and improve their skills:

Learn to make it; then break it!
A major chunk of the hacker's mindset consists of wanting to learn more. In order to really exploit issues and discover further potential vulnerabilities, hackers are encouraged to learn to build what they are targeting. By doing this, there is a greater likelihood that hacker will understand the component being targeted and where most issues appear. For example, when people ask me how to take over a sub-domain, I make sure they understand the Domain Name System (DNS) first and let them set up their own website to play around attempting to "claim" that domain.

Read books. Lots of books.
One way to get better is by reading fellow hunters' and hackers' write-ups. Follow /r/netsec and Twitter for fantastic write-ups ranging from a variety of security-related topics that will not only motivate you but help you improve. For a list of good books to read, please refer to "What books should I read?".

Join discussions and ask questions.
As you may be aware, the information security community is full of interesting discussions ranging from breaches to surveillance, and further. The bug bounty community consists of hunters, security analysts, and platform staff helping one and another get better at what they do. There are two very popular bug bounty forums: Bug Bounty Forum and Bug Bounty World.

Participate in open source projects; learn to code.
Go to https://github.com/explore or https://gitlab.com/explore/projects and pick a project to contribute to. By doing so you will improve your general coding and communication skills. On top of that, read https://learnpythonthehardway.org/ and https://linuxjourney.com/.

Help others. If you can teach it, you have mastered it.
Once you discover something new and believe others would benefit from learning about your discovery, publish a write-up about it. Not only will you help others, you will learn to really master the topic because you can actually explain it properly.

Smile when you get feedback and use it to your advantage.
The bug bounty community is full of people wanting to help others so do not be surprised if someone gives you some constructive feedback about your work. Learn from your mistakes and in doing so use it to your advantage. I have a little physical notebook where I keep track of the little things that I learnt during the day and the feedback that people gave me.


Learn to approach a target.
The first step when approaching a target is always going to be reconnaissance — preliminary gathering of information about the target. If the target is a web application, start by browsing around like a normal user and get to know the website's purpose. Then you can start enumerating endpoints such as sub-domains, ports and web paths.

A woodsman was once asked, "What would you do if you had just five minutes to chop down a tree?" He answered, "I would spend the first two and a half minutes sharpening my axe."
As you progress, you will start to notice patterns and find yourself refining your hunting methodology. You will probably also start automating a lot of the repetitive tasks.

Related word


  1. How To Pentest A Website
  2. Pentest Usb
  3. Hacking The System
  4. Hacking Simulator
  5. Pentest Wordpress
  6. Pentest Keys
  7. Hacking Google
  8. Pentest Windows
  9. Hacker Box
  10. Pentest Jobs
  11. Pentestbox

Chapter 1To 5 HTML

Contents

 
About
 
................................................................................................................................................................................... 1
 
Chapter 1: Getting started with HTML
 
................................................................................................................ 2
 
Section 1.1: Hello World 2
 
Chapter 2: Doctypes
 
.................................................................................................................................................... 4
 
Section 2.1: Adding the Doctype 4
Section 2.2: HTML 5 Doctype 4
 
Chapter 3: Headings
 
.................................................................................................................................................... 5
 
Section 3.1: Using Headings 5
 
Chapter 4: Paragraphs
 
.............................................................................................................................................. 6
 
Section 4.1: HTML Paragraphs
Chapter 5: Text Formatting
 
.....................................................................................................................................  6
.....................................................................................................................................  7
 
Section 5.1: Highlighting 7
Section 5.2: Bold, Italic, and Underline 7
Section 5.3: Abbreviation 8
Section 5.4: Inserted, Deleted, or Stricken 8
Section 5.5: Superscript and Subscript 8
 
Chapter 1: Getting started with HTML

Version Specification Release Date
1.0 N/A 1994-01-01
2.0 RFC 1866
1995-11-24
3.2 W3C: HTML 3.2 Specification
1997-01-14
4.0 W3C: HTML 4.0 Specification
1998-04-24
4.01 W3C: HTML 4.01 Specification
1999-12-24
5 WHATWG: HTML Living Standard
2014-10-28
5.1 W3C: HTML 5.1 Specification
2016-11-01
Section 1.1: Hello World
Introduction

HTML (Hypertext Markup Language) uses a markup system composed of elements which represent specific content. Markup means that with HTML you declare what is presented to a viewer, not how it is presented. Visual representations are defined by Cascading Style Sheets (CSS) and realized by browsers. Still existing elements that allow for such, like e.g. font, "are entirely obsolete, and must not be used by authors"[1].
HTML is sometimes called a programming language but it has no logic, so is a markup language. HTML tags provide semantic meaning and machine-readability to the content in the page.
An element usually consists of an opening tag (<element_name>), a closing tag (</element_name>), which contain the element's name surrounded by angle brackets, and the content in between:
<element_name>...content...</element_name>

There are some HTML elements that don't have a closing tag or any contents. These are called void elements. Void elements include <img>, <meta>, <link> and <input>.
Element names can be thought of as descriptive keywords for the content they contain, such as video, audio, table, footer.
A HTML page may consist of potentially hundreds of elements which are then read by a web browser, interpreted and rendered into human readable or audible content on the screen.
For this document it is important to note the difference between elements and tags:

Elements: video, audio, table, footer

Tags: <video>, <audio>, <table>, <footer>, </html>, </body>


Element insight

Let's break down a tag...

The <p> tag represents a common paragraph.

Elements commonly have an opening tag and a closing tag. The opening tag contains the element's name in angle brackets (<p>). The closing tag is identical to the opening tag with the addition of a forward slash (/) between the opening bracket and the element's name (</p>).
Content can then go between these two tags: <p>This is a simple paragraph.</p>.
 
Creating a simple page

The following HTML example creates a simple "Hello World" web page.

HTML files can be created using any text editor. The files must be saved with a .html or .htm[2] extension in order to be recognized as HTML files.

Once created, this file can be opened in any web browser.


Simple page break down

These are the tags used in the example:

Tag Meaning
<!DOCTYPE> Defines the HTML version used in the document. In this case it is HTML5.
See the doctypes topic for more information.
Opens the page. No markup should come after the closing tag (</html>). The lang attribute declares
 
<html>


<head>


<meta>
 
the primary language of the page using the ISO language codes (en for English). See the Content Language topic for more information.
Opens the head section, which does not appear in the main browser window but mainly contains information about the HTML document, called metadata. It can also contain imports from external stylesheets and scripts. The closing tag is </head>.
Gives the browser some metadata about the document. The charset attribute declares the character encoding. Modern HTML documents should always use UTF-8, even though it is not a requirement. In HTML, the <meta> tag does not require a closing tag.
See the Meta topic for more information.
 
<title> The title of the page. Text written between this opening and the closing tag (</title>) will be displayed on the tab of the page or in the title bar of the browser.
<body> Opens the part of the document displayed to users, i.e. all the visible or audible content of a page. No content should be added after the closing tag </body>.
<h1> A level 1 heading for the page.
See headings for more information.
<p> Represents a common paragraph of text.

1. ↑ HTML5, 11.2 Non-conforming features
2. ↑ .htm is inherited from the legacy DOS three character file extension limit.
 
Chapter 2: Doctypes

Doctypes - short for 'document type' - help browsers to understand the version of HTML the document is written in for better interpretability. Doctype declarations are not HTML tags and belong at the very top of a document. This topic explains the structure and declaration of various doctypes in HTML.
Section 2.1: Adding the Doctype
The <!DOCTYPE> declaration should always be included at the top of the HTML document, before the <html> tag.

Version ≥ 5

See HTML 5 Doctype for details on the HTML 5 Doctype.


Section 2.2: HTML 5 Doctype
HTML5 is not based on SGML (Standard Generalized Markup Language), and therefore does not require a reference to a DTD (Document Type Definition).
HTML 5 Doctype declaration:

Case Insensitivity

Per the W3.org HTML 5 DOCTYPE Spec:

A DOCTYPE must consist of the following components, in this order:

1. A string that is an ASCII case-insensitive match for the string "<!DOCTYPE".

therefore the following DOCTYPEs are also valid:


This SO article discusses the topic extensively: Uppercase or lowercase doctype?
 
Chapter 3: Headings

HTML provides not only plain paragraph tags, but six separate header tags to indicate headings of various sizes and thicknesses. Enumerated as heading 1 through heading 6, heading 1 has the largest and thickest text while heading 6 is the smallest and thinnest, down to the paragraph level. This topic details proper usage of these tags.
Section 3.1: Using Headings
Headings can be used to describe the topic they precede and they are defined with the <h1> to <h6> tags. Headings support all the global attributes.

<h1> defines the most important heading.
<h6> defines the least important heading.

Defining a heading:

Correct structure matters

Search engines and other user agents usually index page content based on heading elements, for example to create a table of contents, so using the correct structure for headings is important.
In general, an article should have one h1 element for the main title followed by h2 subtitles – going down a layer if necessary. If there are h1 elements on a higher level they shoudn't be used to describe any lower level content.

Example document (extra intendation to illustrate hierarchy):

 
Chapter 4: Paragraphs

Column Column
<p> Defines a paragraph
<br> Inserts a single line break
<pre> Defines pre-formatted text

Paragraphs are the most basic HTML element. This topic explains and demonstrates the usage of the paragraph element in HTML.

Section 4.1: HTML Paragraphs

The HTML <p> element defines a paragraph:


Display-

You cannot be sure how HTML will be displayed.

Large or small screens, and resized windows will create different results.

With HTML, you cannot change the output by adding extra spaces or extra lines in your HTML code. The browser will remove any extra spaces and extra lines when the page is displayed:
 
Chapter 5: Text Formatting

While most HTML tags are used to create elements, HTML also provides in-text formatting tags to apply specific text-related styles to portions of text. This topic includes examples of HTML text formatting such as highlighting, bolding, underlining, subscript, and stricken text

Section 5.1: Highlighting

The <mark> element is new in HTML5 and is used to mark or highlight text in a document "due to its relevance in another context".1

The most common example would be in the results of a search were the user has entered a search query and results are shown highlighting the desired query.


Output:


A common standard formatting is black text on a yellow background, but this can be changed with CSS.

Section 5.2: Bold, Italic, and Underline
Bold Text

To bold text, use the <strong> or <b> tags:


or


What's the difference? Semantics. <strong> is used to indicate that the text is fundamentally or semantically important to the surrounding text, while <b> indicates no such importance and simply represents text that should be bolded.

If you were to use <b> a text-to-speech program would not say the word(s) any differently than any of the other words around it - you are simply drawing attention to them without adding any additional importance. By using
<strong>, though, the same program would want to speak those word(s) with a different tone of voice to convey that the text is important in some way.

Italic Text

To italicize text, use the <em> or <i> tags:

 
or


What's the difference? Semantics. <em> is used to indicate that the text should have extra emphasis that should be stressed, while <i> simply represents text which should be set off from the normal text around it.

For example, if you wanted to stress the action inside a sentence, one might do so by emphasizing it in italics via
<em>: "Would you just submit the edit already?"

But if you were identifying a book or newspaper that you would normally italicize stylistically, you would simply use
<i>: "I was forced to read Romeo and Juliet in high school.

Underlined Text

While the <u> element itself was deprecated in HTMl 4, it was reintroduced with alternate semantic meaning in HTML 5 - to represent an unarticulated, non-textual annotation. You might use such a rendering to indicate misspelled text on the page, or for a Chinese proper name mark.


Section 5.3: Abbreviation

To mark some expression as an abbreviation, use <abbr> tag:


If present, the title attribute is used to present the full description of such abbreviation.

Section 5.4: Inserted, Deleted, or Stricken

To mark text as inserted, use the <ins> tag:


To mark text as deleted, use the <del> tag:


To strike through text, use the <s> tag:


Section 5.5: Superscript and Subscript

To offset text either upward or downward you can use the tags <sup> and <sub>. To create superscript:
 

To create subscript:
 
@EVERYTHINGNT
Related posts
  1. Hacking Names
  2. Pentest Free
  3. Hacking Health
  4. Hacker
  5. Pentest Tools
  6. Pentest Magazine
  7. Pentest Checklist
  8. Pentesterlab
  9. Pentest Ios
  10. Hacking Bluetooth
  11. Pentest Meaning
  12. Hacking Linux
  13. Pentesting And Ethical Hacking
  14. Pentest Lab Setup

Ransomware.OSX.KeRanger Samples


Research: New OS X Ransomware KeRanger Infected Transmission BitTorrent Client Installer by Claud Xiao

Sample credit: Claud Xiao


File information

d1ac55a4e610380f0ab239fcc1c5f5a42722e8ee1554cba8074bbae4a5f6dbe1 
1d6297e2427f1d00a5b355d6d50809cb 
Transmission-2.90.dmg

e3ad733cea9eba29e86610050c1a15592e6c77820927b9edeb77310975393574 
56b1d956112b0b7bd3e44f20cf1f2c19 
Transmission

31b6adb633cff2a0f34cefd2a218097f3a9a8176c9363cc70fe41fe02af810b9
14a4df1df622562b3bf5bc9a94e6a783 
General.rtf

d7d765b1ddd235a57a2d13bd065f293a7469594c7e13ea7700e55501206a09b5 
24a8f01cfdc4228b4fc9bb87fedf6eb7 
Transmission2.90.dmg

ddc3dbee2a8ea9d8ed93f0843400653a89350612f2914868485476a847c6484a
3151d9a085d14508fa9f10d48afc7016 
Transmission

6061a554f5997a43c91f49f8aaf40c80a3f547fc6187bee57cd5573641fcf153 
861c3da2bbce6c09eda2709c8994f34c 
General.rtf


Download
Related posts

  1. Hacking Tutorials
  2. Hacking Apps
  3. Hacking Software
  4. Pentesting
  5. Pentest Enumeration
  6. Hacking With Raspberry Pi
  7. Hacking With Python
  8. Pentest Reporting Tool
  9. Pentest Red Team
  10. Hacking Wifi
  11. Pentest Open Source
  12. Pentest Wordpress

6/06/2020

Tishna: An Automated Pentest Framework For Web Servers, Web Applications To Web Security

About Tishna:
   Tishna is complete automated pentest framework for web servers, application layer to web security.

   Tishna was tested on: Kali Linux, Parrot Security OS, Black Arch, Termux, Android Led TV.


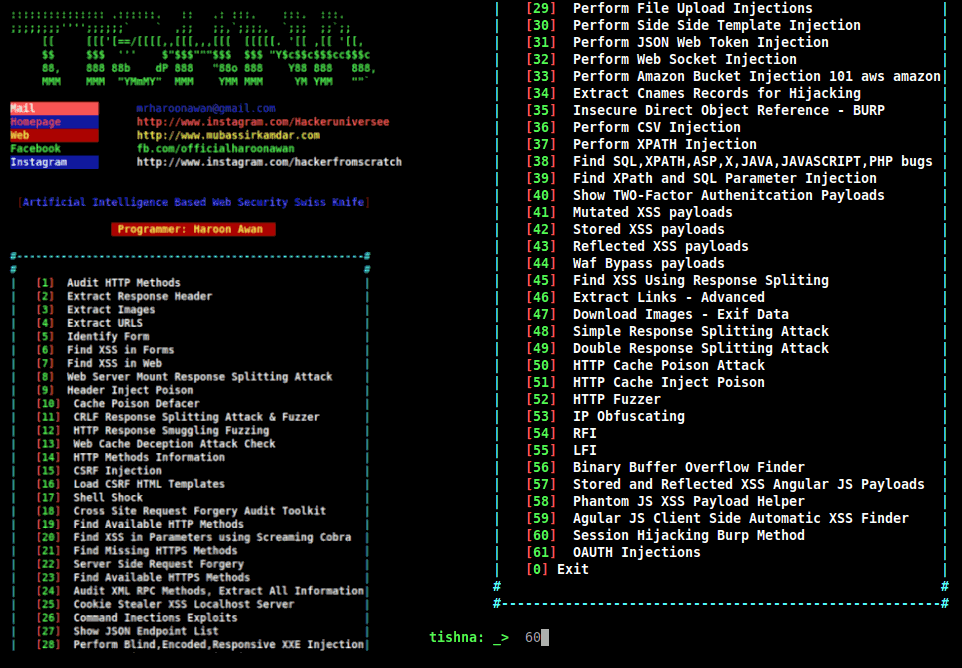
Tishna's interface: Tishna has 62 options with full automation and can be use for web security swiss knife.

Tishna's installation: First, boot your Kali Linux or Parrot Security OS up. Then open Terminal and enter these commands

Appeared:
  • Cyber Space (Computer Security).
  • Terror Security (Computer Security).
  • National Cyber Security Services.

Brief Introduction
  • Tishna is useful in Banks, Private Organisations and Ethical hacker personnel for legal auditing.
  • It serves as a defense method to find as much as information possible for gaining unauthorised access and intrusion.
  • With the emergence of more advanced technology, cybercriminals have also found more ways to get into the system of many organizations.
  • Tishna software can audit, servers and web behaviour.
  • Tishna can perform Scanning & Enumeration as much as possible of target.
  • It's first step to stop cyber criminals by securing your Servers and Web Application Security.
  • Tishna is false positive free, when there is something it will show no matter what, if it is not, it will give blank results rather error.

Developer

Support to the coder
   You can sponsor and support via BTC.
   The bitcoin address: 3BuUYgEgsRuEra4GwqNVLKnDCTjLEDfptu
qr code

Continue reading


Learning Web Pentesting With DVWA Part 1: Installation


In this tutorial series I'm going to walk you through the damn vulnerable web application (DVWA) which is damn vulnerable. Its main goal according to the creators is "to aid security professionals to test thier skills and tools in a legal environment, help web developers better understand the process of securing web applications and to aid both students & teachers to learn about web application security in a controlled class room environment."

I am going to install DVWA in docker so the prerequisite for this tutorial will be an installation of docker (Docker is not the only way to install DVWA but if you have docker already installed then it may be the easiest way to install DVWA).

To install DVWA in docker run your docker deamon if it's not running already and open a terminal or powershell and type:

docker rum --rm -it -p 8080:80 vulnerables/web-dvwa


It will take some time to pull the image from docker hub depending on your internet speed and after it is complete it will start the dvwa application. In the command we have mapped the image instance's port 80 to our hosts port 8080 so we should be able to access the web application from our host at http://localhost:8080

Now open your favorite web browser and go to http://localhost:8080
You should be prompted with a login screen like this:


login with these creds:
username: admin
password: password

After login you'll see a database setup page since this is our first run. Click on Create / Reset Database button at the bottom. It will setup database and redirect you to login page. Now login again and you'll see a welcome page.


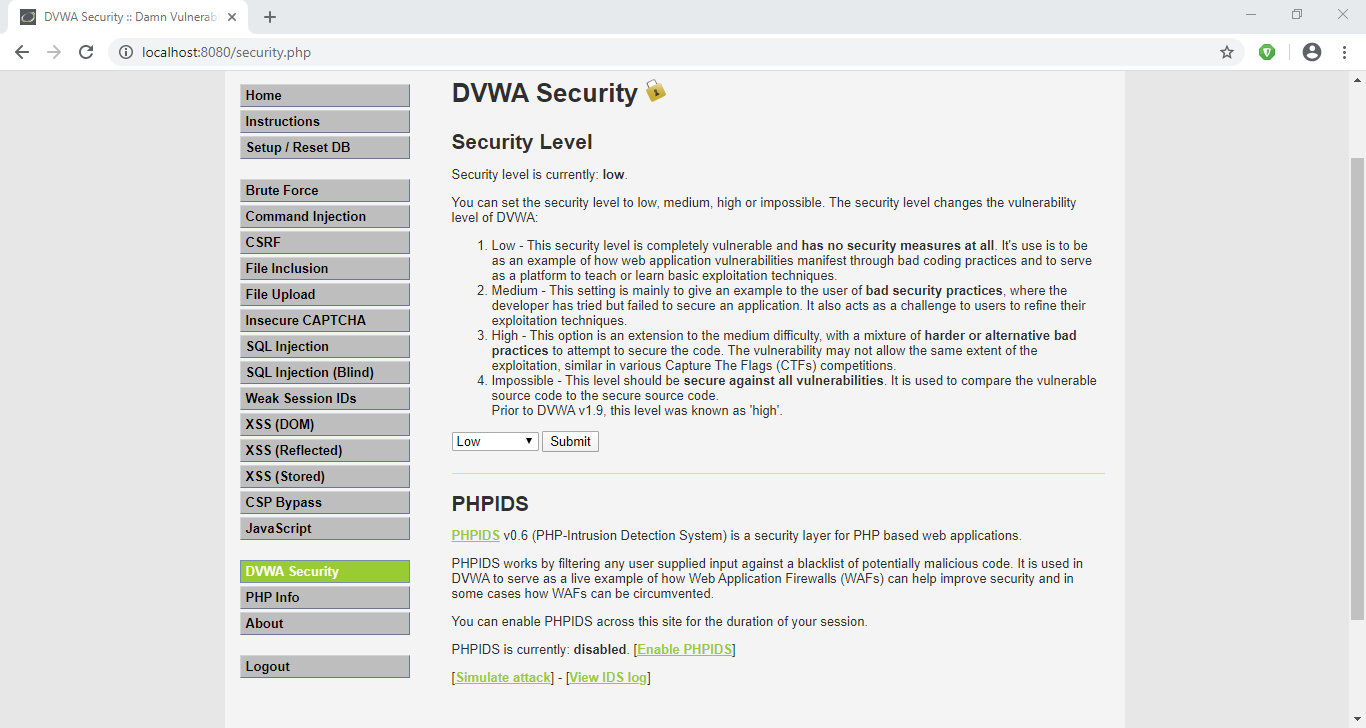
Now click on DVWA Security link at the bottom of the page navigation and make sure the security level is set to Low. If it is not click on the dropdown, select Low and then click submit.


Now our setup is complete, so lets try a simple SQL attack to get a taste of whats about to come.

Click on SQL Injection in navigation menu.
You'll be presented with a small form which accepts User ID.
Enter a single quote (') in the User ID input field and click Submit.
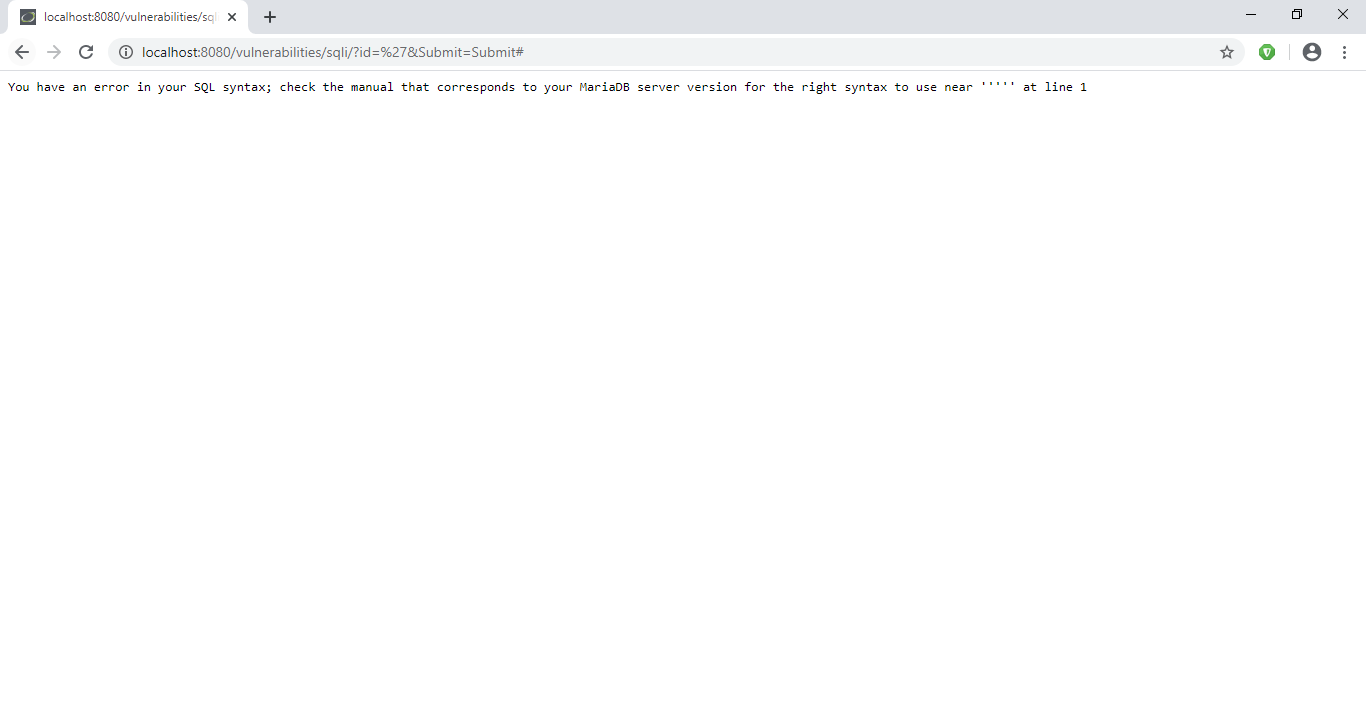
You'll see an SQL error like this:


From the error message we can determine that the server has a MariaDB database and we can see the point of injection.
Since there are many quotes we are not able to determine the exact location of our injection. Lets add some text after our single quote to see exactly where our injection point is.
Now I am going to enter 'khan in the User ID field and click Submit.


Now we can see exactly where the point of injection is. Determining the point of injection is very important for a successful SQL injection and is sometimes very hard too, though it might not be that much useful here in this exercise.

Now lets try the very basic SQL Injection attack.
In the User ID field enter ' or 1=1-- - and click Submit.


We will explain what is going on here in the next article.


References:-
1. DVWA Official Website: http://www.dvwa.co.uk/
Related posts
  1. Hacker Ethic
  2. Pentest Ios
  3. Pentest+ Vs Ceh
  4. Pentest Network
  5. Pentest Iso
  6. Hacking Jailbreak
  7. Pentest With Metasploit
  8. Pentestlab
  9. Hacking Programs
  10. Hacker Wifi Password
  11. Pentest Online Course
  12. Pentest Guide
  13. Pentest Report
  14. Pentest Ftp
  15. Hacking Quotes
  16. Hacking Network